 Image selections are “frames”, characterized by animated dotted lines, that can be used as guidelines to create content or edit the content inside the selected area.
Gimp offers a combination of seven different tools that make selection quick, painless, and precise.
You may remember that I already broke down the basic purpose, or description/use, of each tool in a previous lesson, but there is much more to learn about the use of each tool.
Let’s begin with a recap of the available selection tools, along with a few more of their capabilities.
Rectangle Select
![]() Click and drag to create rectangular and square-shaped selections with the rectangle select tool.
Click and drag to create rectangular and square-shaped selections with the rectangle select tool.
The rectangle select tool is characterized — along with the ellipse select tool — by square or rectangular boxes, called “handles”, that appear when you hover over various areas of a selection. They can be dragged to re-size the selection. You can click on a selection to show/remove the “handles” (or hit Enter, but only to remove them).
Hold down the Ctrl key (before starting your selection) to subtract your selection from an existing selection.
Hold down the Ctrl key (after starting your selection) to make your starting point the center of the selection, rather than a corner.
Hold down the Shift key (before starting your selection) to add your selection to an existing selection.
Hold down the Shift key (after starting your selection) to keep your selection perfectly square.
The Ctrl + Shift keys can be used together to apply multiple effects at once.
Tool options include modes, rounding corners, shape-constraining, position, size, highlight, guides, auto-shrink and shrink-merged.
Ellipse Select
![]() Click and drag to create oval and circular-shaped selections with the ellipse select tool.
Click and drag to create oval and circular-shaped selections with the ellipse select tool.
The ellipse select tool is characterized — along with the rectangular select tool — by square or rectangular boxes, called “handles”, that appear when you hover over various areas of a selection. They can be dragged to re-size the selection. You can click on a selection to show/remove the “handles” (or hit Enter, but only to remove them).
Hold down the Ctrl key (before starting your selection) to subtract your selection from an existing selection.
Hold down the Ctrl key (after starting your selection) to make your starting point the center of the selection, rather than a corner.
Hold down the Shift key (before starting your selection) to add your selection to an existing selection.
Hold down the Shift key (after starting your selection) to keep your selection perfectly circular.
The Ctrl + Shift keys can be used together to apply multiple effects at once.
Tool options include modes, shape-constraining, position, size, highlight, guides, auto-shrink and shrink-merged.
Free Select (Lasso)
![]() Click and hold while drawing, to make a selection with the free select, or lasso, tool. If the shape that you draw is not “closed”, you can afterward click on the starting point to close/complete the selection with a straight line from the last point.
Click and hold while drawing, to make a selection with the free select, or lasso, tool. If the shape that you draw is not “closed”, you can afterward click on the starting point to close/complete the selection with a straight line from the last point.
Alternatively, straight lines can be freely created by single-clicking at various points, causing straight selection lines to form between each anchor point, nearly identical to how the path tool works.
Fuzzy Select (Magic Wand)
![]() You can select a continuous (or nearly so) area of color with the fuzzy select tool, or magic wand.
You can select a continuous (or nearly so) area of color with the fuzzy select tool, or magic wand.
This tool can be frustrating, but careful adjustment of the Threshold option can many times help you get the result that you want.
Also useful are the “Selection by” options, that allow you to control which component (Red/Green/Blue/Hue/Saturation/Value) is used to calculate the color-similarity.
One common use for this tool — that I have employed many times — is to cut a (mostly) single color background out of an image to create a completely single-color background.
By Color Select
![]() You can select all pixels of a similar color — regardless of where they are in an image — by clicking on one single pixel while using the color select tool.
You can select all pixels of a similar color — regardless of where they are in an image — by clicking on one single pixel while using the color select tool.
Intelligent Scissors (Shapes From Images)
![]() The intelligent scissors have a mind of their own, especially when used to follow along high-contrast edges, where they can do a lot of the work to help you make selections based on those edges.
The intelligent scissors have a mind of their own, especially when used to follow along high-contrast edges, where they can do a lot of the work to help you make selections based on those edges.
Use the scissors like a cross between the lasso selection tool and the path tool, to guide its selections. “Validate” a selection by clicking inside of it.
This auto-edge snap feature can be disabled by holding down the Shift key as you place the control nodes (click along the selection path).
Foreground Select
![]() You can extract foreground objects from an active layer or selection using the foreground select tool in several stages.
You can extract foreground objects from an active layer or selection using the foreground select tool in several stages.
First, roughly but carefully select the part of the foreground that you want extracted (as if using the fuzzy select tool).
Use the paintbrush and a contrasting color to draw a continuous line — which does not have to be straight — on the selected foreground, making sure to catch in your line all of the basic foreground colors that you want to extract.
Finally, hit Enter to make the selection.
Use the Ctrl key during this process if you need to switch between the foreground and background selection painting.
Selection Modes
![]() Select tools have 4 modes to choose from: Replace, Add, Subtract, and Intersect
Select tools have 4 modes to choose from: Replace, Add, Subtract, and Intersect
You can toggle between selection modes from the tool options, or by holding down the appropriate key while using a selection tool.
Replace Mode
Replace is the default mode; it will create a new selection, or replace anything previously selected.
Add Mode
Add mode allows you to add new selections to existing selections; overlapping selections are made one big selection.
You can hold down the Shift key to use add mode.
Subtract Mode
Subtract mode allows you to take away parts of selections by selecting the parts of selections to remove/subtract.
You can hold down the Ctrl key to use subtract mode.
Intersect Mode
Intersect mode causes areas in both the new and existing selection to become the new selection.
You can hold down the Shift + Ctrl keys to use intersect mode.
Selection Tool Options
Besides modes, antialiasing and feather edges are the only options available for all of the selection tools — and even then they do not work with every selection tool.
Antialiasing allows for a selection’s boundary to be drawn more smoothly.
Feather edges allows for a selection’s boundary to be blurred, or feathered, according to the radius set.
How to Move a Selection
A selection can be moved, with or without also moving the selected portion of the image or layer itself.
After creating a rectangular or elliptical selection, you can click and drag (avoiding the handles) to move the frame only.
Alternatively — and especially for the other selection tools — after creating a selection, click on the Move tool.
You can choose in the Move tool options whether you move the selection, layer, or path.
You can then click and drag the selection, or hold down the Ctrl + Alt keys (or in some cases the Shift + Alt keys or even the Ctrl+ Shift + Alt keys) and drag a selection to move it.
With your cursor hovering over a selection, you can use the arrow keys to move it in any one of the four directions.
Creating Shapes With Selection Tools
Selection tools can be used to create basic shapes.
They can be filled with the fill tool, and/or outlines of the shapes can be outlined via the Stroke Selection option found on the Edit menu, or the Border option found on the Select menu.
Remember: the path tool can also make shapes and “stroke” (or fill in) the lines, and several paint tools can make straight lines when the Shift key is held down.
The Select Menu
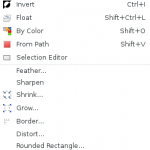
 The “Select” menu drop-down is full of useful selection commands that can be used with or in place of selection tools.
Select All
The select all command selects your entire image (or layer). It is the same as using the Ctrl + A keyboard shortcut.
None
The none command cancels, or de-selects, all selections.
Invert
The invert command causes the selection to move to what was previously un-selected, and selects it instead of the previous selection(s) of the image or layer.
Float
The float command changes a normal selection into a floating selection that is like a temporary layer and must be anchored.
By Color
The by color command is another way to select the “Select by color” tool.
From Path
The from path command will turn a path into a selection, just like the path tool option.
Selection Editor
The selection editor command opens the selection editor, usually shown among the dockable dialogs. The selection editor allows you to see your selection details in greater contrast.
Feather
The feather command works the same as the selection tool option, to feather (or soften) the edges of the selection so that it blends.
Sharpen
The sharpen command reduces the amount of blending around the edges of a selection.
Shrink
The shrink command makes a selection smaller by a specified increment.
Grow
The grow command makes a selection larger by a specified increment.
Border
The border command creates two selections that mirror one another on each side of the original selection, creating a border effect.
Distort
The distort command deforms the selection contour.
Rounded Rectangle
The rounded rectangle command applies rounded corners to your selection.
Toggle QuickMask
The toggle quickmask command toggles the quickmask, unsurprisingly.
Save to Channel
The save to channel command saves your selection as a channel to be used as a channel selection mask.
To Path
The to path command converts a selection into a path.
Conclusion
The Quick Mask is considered a selection mask and is often used closely with selection tools, but I have yet to figure out much of anything about it, so we’re once again skipping it for now!
I hope that you enjoyed this lesson on Gimp’s selection tools and will join us next week for the next topic.

No Comments Yet