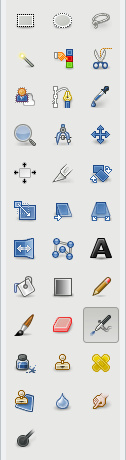
 The Gimp toolbox is a window (or dock) featuring multiple icons, each of which are tools that perform tasks in Gimp.
A basic understanding of each tool is necessary to fully utilize the functionality that Gimp has to offer.
But first, let’s give an honorable mention to the toolbar spaces above and below the cluster of tool icons.
At the top of the toolbox is the drop-target, where images can be dragged and dropped to open them in Gimp.
At the bottom of the toolbox is an area featuring options that change based on the tool selected.
The toolbox can be dragged wider, causing the tool icons to re-align, and the options to be more readily visible, a quick toggle that I find very useful.
For now we will focus on the tools themselves — what each one is called and what it does.
Tools Vs. Toolbox
In the Tools drop-down on the Menu bar there are over 40 different tools available for use.
In the toolbar itself, only 34 are shown by default. Most of the tools missing are color-related tools.
To customize which tools are shown in the toolbox, go to the Menu bar and Edit > Preferences > Toolbox, where each tool can be toggled.
We will be covering — very briefly — each tool available, rather than just those shown in the toolbox by default.
Selection Tools
Rectangle Select
![]() Keyboard Shortcut: R
Keyboard Shortcut: R
The rectangular selection tool makes rectangular or square selections on an image.
You can expand your selection from the center outward (via the toggle option or by holding down the Ctrl key), change the coordinates of your selection, or hold down the Shift key to keep your selection square.
Ellipse Select
![]() Keyboard Shortcut: E
Keyboard Shortcut: E
The ellipse selection tool makes oval or circular selections on an image.
You can expand your selection from the center outward (via the toggle option or by holding down the Ctrl key), change the coordinates of your selection, or hold down the Shift key to keep your selection circular.
Free Select
![]() Keyboard Shortcut: F
Keyboard Shortcut: F
The free select tool, or lasso, allows you to select a hand-drawn region of an image.
Either click and hold down to draw, or click on multiple points to draw connecting lines to create a selection.
Foreground Select
![]() The foreground select tool selects a region containing foreground objects.
The foreground select tool selects a region containing foreground objects.
The initial selection process is fairly straight-forward, similar to the scissor select tool and/or paths tool, but the blue mask that appears, and the paintbrush that you use next to refine the selected area, is all part of a process that I have yet to figure out!
Fuzzy Select
![]() Keyboard Shortcut: U
Keyboard Shortcut: U
The fuzzy select tool, or magic wand, selects a “contiguous region on the basis of color”.
In other words, it selects solid-colored areas of an image, the threshold of which can be increased or decreased as needed.
This is the one tool that I have explored the most over the years, primarily to cut background details out of images; I have found that it works great!
By Color Select
![]() Keyboard Shortcut: Shift + O
Keyboard Shortcut: Shift + O
The select by color tool is very similar to the fuzzy select tool; it selects regions with similar colors.
The main difference between the two is that the color select tool does not select just contiguous regions, but all regions with similar colors.
Intelligent Scissors
![]() Keyboard Shortcut: I
Keyboard Shortcut: I
The scissors select tool selects shapes using intelligent edge-fitting.
They allow you to select the points around an object to frame it (wisely)!
Paint Tools
Bucket Fill
![]() Keyboard Shortcut: Shift + B
Keyboard Shortcut: Shift + B
The bucket fill tool will fill a selected area with a color or pattern.
This tool is fairly straightforward and similar to standard paint programs, but the pattern fill options open up more possibilities.
Blend
![]() Keyboard Shortcut: Shift + L
Keyboard Shortcut: Shift + L
The blend tool allows you to fill a selected area with a color gradient.
Pencil
![]() Keyboard Shortcut: N
Keyboard Shortcut: N
The pencil tool does hard edge painting using a brush.
As with most paint tools, the pencil tool is customizeable, even to the point of adjusting how hard — or soft — the edge of the brush really is.
Paint Brush
![]() Keyboard Shortcut: P
Keyboard Shortcut: P
The paintbrush tool “paints smooth strokes using a brush”, which is true for those of you that can sweep your mouse in smooth strokes, and a blatant lie when the rest of us try it!
Hold down the Ctrl key to turn the brush into a color picker, or the Shift key to draw a straight line.
Eraser
![]() Keyboard Shortcut: Shift + E
Keyboard Shortcut: Shift + E
The eraser tool will erase — completely delete — everything it touches.
The options include adjusting the size/aspect ratio/angle, applying a hard edge, etc.
One interesting way of using the eraser tool would be on a separate layer, something which we will explore later on.
Airbrush
![]() Keyboard Shortcut: A
Keyboard Shortcut: A
The airbrush tool is a brush that paints with variable pressure, for an airbrush-like effect.
Hold down the Ctrl key to turn the airbrush into a color picker, or the Shift key to draw a straight line.
Ink
![]() Keyboard Shortcut: K
Keyboard Shortcut: K
The ink tool allows you to do calligraphy-style painting.
Hold down the Ctrl key to picker a color, or the Shift key to draw a straight line.
Clone
![]() Keyboard Shortcut: C
Keyboard Shortcut: C
The clone tool uses a brush to selectively copy from an image or a pattern. In other words, you can fix up images by blending out parts of them with other parts/patterns/textures, or with other images entirely.
Holding down the Ctrl key will allow you to select a pattern from the image if you so choose, so that you can then brush it in somewhere else as needed.
There are a number of options that make this a very useful tool if you can take the time to learn its intricacies.
Heal
![]() Keyboard Shortcut: H
Keyboard Shortcut: H
The heal tool isn’t doing too much to help my poor little black and blue toe that I unfortunately stubbed last week, but it can help to heal image irregularities. (Maybe it would help if I took a photo of my foot?)
The heal tool is a miracle-worker when used to correct small irregularities such as lines, spots, etc. and so is often used on photos that need minor changes throughout.
Hold down the Ctrl key to click on a section that you want to replace something with, and then click and drag over the section that you want replaced.
I just tested it out on a photo of myself and it certainly works! This tool could be worth spending some time on.
Perspective Clone
![]()
The perspective clone tool clones from an image source after applying a perspective transformation.
Whatever that means. It’s waaaaaay over my head! Even experimenting with this one told me nothing!
Blur/Sharpen
![]() Keyboard Shortcut: Shift + U
Keyboard Shortcut: Shift + U
The blur/sharpen tool uses a brush to either blur or sharpen the areas being brushed.
There is a toggle box that allows you to choose between blurring and sharpening, once the tool is selected.
There are a ton of options available for this tool, to help you to refine the blur or sharpen effect as needed.
Smudge
![]() Keyboard Shortcut: S
Keyboard Shortcut: S
The smudge tool does… pretty much exactly what it sounds like.
This is one of those useful “blemish removing” types of tools that is easy to use but still improves the more you experiment with it.
Dodge/Burn
![]() Keyboard Shortcut: Shift + D
Keyboard Shortcut: Shift + D
The dodge/burn tool uses a brush to selectively lighten or darken the brushed areas.
Dodge (lighten) is the default, but burn (darken) can be toggled either with the toggle box in the options, or by holding down the Ctrl key while you brush.
There are a ton of options available for this tool, and the effects are rather useful.
Transform Tools
Align
![]() Keyboard Shortcut: Q
Keyboard Shortcut: Q
The alignment tool allows you to align or arrange layers and other objects.
I’m sure it’s very useful for that, so we’ll probably learn more about this as we go.
Move
![]() Keyboard Shortcut: M
Keyboard Shortcut: M
The move tool can move selections, layers, and other objects.
The arrow keys can be used to move objects in place of the mouse, when the move tool is active.
You can hold down the Alt key to move the selection frame rather than the selection or image.
Crop
![]() Keyboard Shortcut: Shift + C
Keyboard Shortcut: Shift + C
The crop tool allows for images to be cut down to a rectangular selection; the remaining portions will cropped out of the picture.
The crop size can be adjusted by dragging the corners; when you are finished with your selection, simply hit Enter or click on the selection.
Rotate
![]() Keyboard Shortcut: Shift + R
Keyboard Shortcut: Shift + R
The rotate tool — very predictably — rotates the layer, selection or path.
Scale
![]() Keyboard Shortcut: Shift + T
Keyboard Shortcut: Shift + T
The scale tool allows you to scale (change the size of) the layer, selection or path.
You can do this either by dragging the grid that shows up, or by providing new dimensions in the box.
Shear
![]() Keyboard Shortcut: Shift + S
Keyboard Shortcut: Shift + S
The shear tool was somewhat of a disappointment to me. As it turns out, instead of cutting the wool off images, as I first thought, it merely tilts them in one direction or another. What a let-down.
To use the shear tool, click on the image and drag the grid around as needed. Experimentation is useful here!
Perspective
![]() Keyboard Shortcut: Shift + P
Keyboard Shortcut: Shift + P
The perspective tool can change the angle of a layer, selection or path.
It is most useful when the need arises to correct the position or perspective of a part of an image that appears to be angled wrong, etc.
To use the perspective tool, click on the image and then drag on of the corners as needed to adjust. Experimentation is very useful here.
Flip
![]() Keyboard Shortcut: Shift + F
Keyboard Shortcut: Shift + F
The flip tool can reverse a layer, selection, or path either vertically or horizontally.
Cage Transform
![]() Keyboard Shortcut: Shift + G
Keyboard Shortcut: Shift + G
The cage transform tool allows you to deform a selection with a cage.
In other words, it allows you to make a selection and then distort that selection, so unless you’re making the next piece of modern art… let’s just say I haven’t found much use for this particular tool just yet!
Color Tools
Color Balance
![]() This tool is not shown by default in the toolbox, but can be added. We’ll look into color tools at a later date.
This tool is not shown by default in the toolbox, but can be added. We’ll look into color tools at a later date.
Hue-Saturation
![]() This tool is not shown by default in the toolbox, but can be added. We’ll look into color tools at a later date.
This tool is not shown by default in the toolbox, but can be added. We’ll look into color tools at a later date.
Colorize
![]() This tool is not shown by default in the toolbox, but can be added. We’ll look into color tools at a later date.
This tool is not shown by default in the toolbox, but can be added. We’ll look into color tools at a later date.
Brightness-Contrast
![]() This tool is not shown by default in the toolbox, but can be added. We’ll look into color tools at a later date.
This tool is not shown by default in the toolbox, but can be added. We’ll look into color tools at a later date.
Threshold
![]() This tool is not shown by default in the toolbox, but can be added. We’ll look into color tools at a later date.
This tool is not shown by default in the toolbox, but can be added. We’ll look into color tools at a later date.
Levels
![]() This tool is not shown by default in the toolbox, but can be added. We’ll look into color tools at a later date.
This tool is not shown by default in the toolbox, but can be added. We’ll look into color tools at a later date.
Curves
![]() This tool is not shown by default in the toolbox, but can be added. We’ll look into color tools at a later date.
This tool is not shown by default in the toolbox, but can be added. We’ll look into color tools at a later date.
Posterize
![]() This tool is not shown by default in the toolbox, but can be added. We’ll look into color tools at a later date.
This tool is not shown by default in the toolbox, but can be added. We’ll look into color tools at a later date.
Desaturate
![]() This tool is not shown by default in the toolbox, but can be added. We’ll look into color tools at a later date.
This tool is not shown by default in the toolbox, but can be added. We’ll look into color tools at a later date.
Other Tools
Paths
![]() Keyboard Shortcut: B
Keyboard Shortcut: B
The paths tool creates and edits paths.
You can use it to create a selection by clicking around an object to form a path, finishing up by holding down the Ctrl key to link the path back together with the first spot clicked. The lines can then be adjusted by holding down the Ctrl key while dragging the lines around.
Then, use either the Shift + V keyboard shortcut, or go to the Select > From Path menu option to change the path to a selection.
Color Picker
![]() Keyboard Shortcut: O
Keyboard Shortcut: O
The color picker tool allows you to select colors from pixels of the image you have open at the time.
Zoom
![]() Keyboard Shortcut: Z
Keyboard Shortcut: Z
The zoom tool magnifies or de-magnifies an image as needed.
You can left-click to magnify/enlarge the image, or draw around an area to magnify it specifically. The + key can also be used to magnify an image.
Holding down the Ctrl key and clicking (left-clicking) and/or selecting an area will shrink the magnification. The - key can also be used.
The magnification percentage is shown — and can be changed — via a drop-down when the zoom tool is selected, and in many other cases also.
Measure
![]() Keyboard Shortcut: M
Keyboard Shortcut: M
The measure tool measures distances and angles.
I tried this tool on a photo of myself and evidently my eyes are 54 pixels apart… I kinda get the feeling I’m using it wrong!
(BTW, are you supposed to measure from the inside corners of the eyes, outside corners, or center of the eyeballs?!? And should the image be life-sized? *Snicker*)
Text
![]() Keyboard Shortcut: T
Keyboard Shortcut: T
The text tool creates or edits text layers.
All the usual font/size/style options can be customized.
Quick Mask
Keyboard Shortcut: Shift + Q
The quick mask tool creates a red color overlay that allows you to select areas to clean up images and apply effects.
It does not have its own toolbox button or menu location, but instead can be activated by using its keyboard shortcut when the paint tool (among others) is selected.
Conclusion
With these tools in your toolbox — and various filters/etc. that will be explored later — most tasks can be performed with relative ease.
The trick is knowing which tools to use — and in what order — and how — to perform each task.
We’ll get into a bit of that here and there, so stay tuned!
[…] may remember that I already broke down the basic purpose, or description/use, of each tool in a previous lesson, but there is much more to learn about the use of each […]
[…] transform tools — covered briefly in my post about the Gimp Toolbox — are, for the most part, closely related to the tools found on the image menu, but since […]