 Gimp’s image menu includes commands that affect the entire image in one way or another, as opposed to only parts/selections/layers/etc.
Gimp’s transform tools — covered briefly in my post about the Gimp Toolbox — are, for the most part, closely related to the tools found on the image menu, but since they are mostly easy to use and self-explanatory, we’ll not cover them in more depth right now.
We will focus instead on breaking down the commands on the image menu, and figuring out what makes each one tick — or tock.
Duplicate
Keyboard Shortcut: Ctrl + D
The duplicate command allows you to create a new image that is an exact duplicate of your current image.
Mode
The mode submenu provides several options that allow you to change the image color mode.
RGB mode
RGB (Red/Green/Blue) is the default mode, and provides the highest quality images, each color with an intensity value of 0-255.
It is simple to change RGB to other modes, but ultimately difficult — or impossible — to convert other modes back into RGB.
Grayscale mode
Grayscale mode converts images to grayscale with 256 levels of gray, from 0 (black) to 255 (white).
Indexed mode
Indexed mode used a fixed number of colors (256 or less) and so reduces file size.
Assign Color Profile…
The assign color profile command does exactly as it suggests — whatever that is!
Color profiles are look-up tables that can translate color characteristic of a device to a device-independent color space.
Convert to Color Profile…
The convert color profile command does exactly as it suggests — whatever that is!
Transform
The transform submenu provides options for flipping, rotating, and slicing.
Flip Horizontally; Flip Vertically
The flip commands allow you to flip an image horizontally (side-to-side) or vertically (top-to-bottom).
Rotation
The rotation commands can rotate an image 90 degrees clockwise or counterclockwise, as well as rotate it a full 180 degrees.
Guillotine
The guillotine command slices an image up along the guides, and creates a new image with each piece.
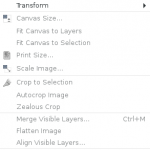
Canvas Size
The canvas size command allows you to re-size the canvas, which is the visible area of the image; the image itself is not re-sized, and can still be modified, but not seen.
Fit Canvas to Layers
The fit canvas to layers command allows you to automatically re-size the canvas to show even the largest layer, making all areas of the image visible once again.
Fit Canvas to Selection
The fit canvas to selection command re-sizes the canvas to fit your selection.
Print Size
The print size command opens a dialog from which you can change the dimensions and resolution of an image for when it is printed, all without changing the actual dimensions of an image.
Scale Image
The scale image command allows you to re-size the image — contents,layers, canvas, and all.
Crop to Selection
The crop to selection command removes all parts of the image outside of the selection to effectively crop the image.
Autocrop Image
The autocrop image command searches the border of the active layer for the largest same-color area and crops that area off of the entire image (including all other layers).
Zealous Crop
The zealous crop command uses a single solar color in the active layer as a guide to crop instances of that color from the image as best it can.
Merge Visible Layers
Keyboard Shortcut: Ctrl + M
The merge visible layers command merges all layers with the “eye” icon (in the layers dialog), meaning they are visible, into a single layer.
Flatten Image
The flatten image command merges all layers into one without transparency.
Align Visible Layers…
The align visible layers command will — go ahead and guess! — align all layers with the “eye” icon (in the layers dialog) either vertically, horizontally, etc.
Guides
Guides are reference lines that can be created as extensions to the ruler, displayed as lines over your image.
The image menu guides submenu has a number of commands that allow you to work with guides.
New Guide
The new guide command opens up a dialog box from which you can specify the direction and position (in pixels) that the new guide should be placed in.
New Guide (by Percent)
The new guide by percent command opens up a dialog box from which you can specify the direction and position (by percent) that the new guide should be placed in.
New Guides from Selection
The new guides from selection command adds four new guides, one along each side of your selection.
Remove all guides
The remove all guides command… do I really need to say it?
Configure Grid…
The configure grid command lets you set up the properties of the grid that can be displayed over your image as you work.
The dialog allows you to configure line style, colors, spacing, and offset.
Image Properties
Keyboard Shortcut: Alt + Return
The image properties command opens the window that shows properties for your image.
You will see standard details such as pixel dimensions, print size, resolution, color space, file name/size/type, etc.