 In previous posts on the subject of Gimp and/or image-editing, I have alluded to layers, but without much detail.
Today is the day when details will be revealed as I peel back the cover, layer by layer… ok, too corny, let me start over.
Image layers can be visualized as transparent images, all stacked one-on-top-of-the-other within a single image.
Layers are incredible tools that can be added, removed, made visible/invisible, re-arranged, and much more, all with just a few clicks of the mouse. The design possibilities are endless. Well, almost endless.
There is no limit to the number of layers that an image can have, although you will want to take your system’s memory into consideration before going wild with them.
Several previous lessons have touched on layers — or at least layer commands — as there are several layer-related command scattered throughout the File, Image and View menus, such as “Open as Layers…”, “Fit Canvas to Layers”, “Merge Visible Layers”, “Align Visible Layers…”, and “Show Layer Boundary”.
In many cases, new layers are created by default as you work on an image. For example, when text is added to an image in Gimp, each new text box is is treated as a new layer.
One note of importance is that layers are only accessible in raw file formats (e.g. .xcf), and not in standard formats (e.g. .png, .jpg, etc.)
How to Create a New Layer
New layers can be created several different ways.
1. Select “New Layer” from the Layer Menu. (Alternately, use the Shift + Ctrl + N keyboard shortcut.)
2. Select “Duplicate Layer” from the Layer Menu. (Alternately, use the Shift + Ctrl + D keyboard shortcut.)
3. Copy or cut a selection/element and paste it via the Ctrl + V keyboard shortcut or via the Edit > Paste on the menu bar, to create a “floating layer”, which is a temporary layer that can be made permanent.
4. Click on the “Create a new layer” button at the bottom of the Layers Dialog.
Layer Properties
Layers each have a number of unique attributes, or properties…
Name
Layers are assigned automatic names when they are created, which you can change from the Layers Dialog.
Alpha Channel
Alpha channels encode how transparent a layer is at each pixel. White is completely opaque, black is completely transparent, and grey are partially transparent.
Some layers — especially the background layer — may be without an alpha channel, but you can usually create one if necessary.
Layer Type
The layer type is determined by both the image type and the presence/absence of an alpha channel.
The layer type can be RGB, RGBA, Gray, GrayA, Indexed, or IndexedA.
Visibility
The layer visibility — or, whether or not it is visible or invisible, toggle-able from the layers dialog box — is an image attribute.
Linkage
The linkage attribute, shown as a chain icon next to the eye icon on the layers dialog box, enables you to group layers for operations on multiple layers.
Size and Boundaries
Layer boundaries are not always the same as image boundaries, and so each layer has its own size and boundary attributes.
A text layer, for example, is only as large as the text it contains, and an element pasted as a new layer will create a layer no larger or smaller than the element that is pasted.
Opacity
The opacity of a layer determines how much the colors from lower layers show through an active layer, measured from 0 (complete transparency) to 100 (complete opacity).
Mode
The mode of a layer determines how colors from various layers are merged, and what the visible result will be.
Layer Mask
Layer masks are an alternate method of controlling the transparency of a layer.
Layer masks must be added — they do not exist by default.
Lock Alpha Channel
The lock alpha channel is more of a setting than an attribute. It is a small checkbox in the Layers Dialog that allows you to control the lock setting for the transparency of a layer.
When checked, the layer’s alpha channel is locked, and changes cannot be made to the transparency.
Layer Modes
There are 21 layer modes, or blending modes, available in Gimp, which are used to determine how to combine each top-layer pixel with the corresponding pixels in the layers below.
Layer modes can be set for each layer from the “mode menu”, a drop-down at the top of the layers dialog box.
The available modes are: Normal, Dissolve, Multiply, Divide, Screen, Overlay, Dodge, Burn, Hard light, Soft light, Grain extract, Grain merge, Difference, Addition, Subtract, Darken only, Lighten only, Hue, Saturation, Color, and Value
For details about each mode, see Gimp’s documentation.
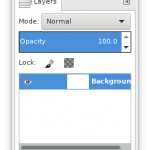
The Layers Dialog
The layers dialog box is where layers are shown and organized.
The layers dialog is dock-able, and can be accessed via several means.
1. …the Windows > Dockable Dialogs > Layers menu.
2. …clicking a tab on any dockable dialog and choosing Add Tab > Layers.
3. …the Ctrl + L keyboard shortcut.
Each layer shows up as a thumbnail in the layers dialog, ordered top to bottom (the thumbnail on top is the top layer, etc.)
The buttons/options on the dialog, above the list of layers, show characteristics of individual layers, and the buttons/options below the list apply to the entire layer list.
Right-click on a layer thumbnail to open the layer context menu.
The active layer can be seen highlighted in blue.
Layer Attributes
Visibility: Click on the “eye” icon before each layer to toggle whether or not that layer is visible. Shift + click on the eye icon to hide all layers except the one selected.
Chain Layers: Click on the “chain” icon to group layers for operations to be performed on multiple layers at a time.
Layer Thumbnail: A white border around the layer thumbnail indicates that the layer is active, and a black border indicates that the layer is inactive. Left-click and hold to make the thumbnail larger.
Layer Name: Double-click on the thumbnail or the layer name to rename a layer.
Layer Characteristics
Layer characteristics are the options on the Layers Dialog above the list of layers.
Mode: See Layer Modes mentioned previously.
Opacity: Opacity can be adjusted via a slider from 0 to 100.
Lock: Pixels can be locked to prevent modifications, and the alpha channel can be locked to maintain transparency.
Layer Management
Layer management options are shown on the layers dialog below the list of layers.
New Layer: Creates a new layer.
Raise Layer: Moves a layer one place up in the list and view. Shift + click to move the layer to the very top.
Lower Layer: Moves a layer one place down in the list and view. Shift + click to move the layer to the very bottom.
Duplicate Layer: Creates a copy of the active layer, named after the source layer and suffixed with a number.
Anchor Layer: Anchors a temporary active layer to the previous active layer.
Delete Layer: Deletes an active layer.
Additional layer functions can be found in the layer context menu (right-click a layer in the layers dialog) and in other various menus.)
Click/hold/drag a thumbnail to re-arrange the layer quickly.
How to Group Layers
Similar layers can be grouped in “tree-like” structures, and even embedded within another group of layers.
Click on the “Create a new layer group” button on the Layers Dialog, or go to Layer > New Layer Group on the menu.
Make sure to give the group a distinctive name that will not confuse it with a single layer.
You can add layers to the group by dragging them into it on the Layers Dialog.
Additional details about grouping layers can be found in Gimp’s documentation.
Conclusion
Today’s topic of conversation is brought to you by onions — those multi-layered tear-inducing bundles of joy and flavor.
(AKA I was cutting onions earlier today and started thinking about how they were very similar — and yet so very dis-similar — to what I was writing about!)
Ignore me. It’s late. I need sleep.
See you next week, for part two!