 On most keyboards, if you place the index fingers of each hand on the F and J keys, you will feel a raised bump on each one.
These bumps indicate the position of the keys, without requiring you to look at the keyboard.
Once your left index finger is positioned on F and your right is on J, the remaining fingers of each hand will naturally line up.
The remaining fingers of your left hand should rest on the D, S and A keys. The remaining fingers of your right hand should rest on the K, L and ; keys. Both thumbs will fall naturally on the spacebar.
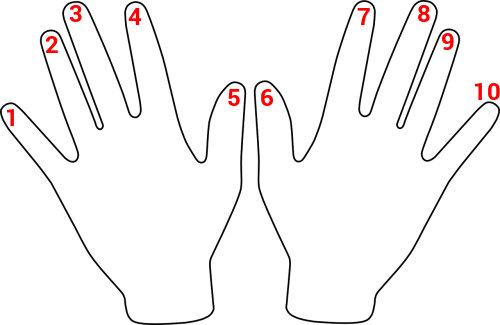
Each finger will press not only the key that it rests on, but also several other nearby keys. The assignments are:
1. Left Hand Pinky Finger: Q, A and Z
2. Left Hand Ring Finger: W, S and X
3. Left Hand Middle Finger: E, D, and C
4. Left Hand Index Finger: R, F, V, B, G and T
5. & 6. Thumbs: Spacebar
7. Right Hand Index Finger: Y, H, N, M, J and U
8. Right Hand Middle Finger: I, K, < and ,
9. Right Hand Ring Finger: O, L, > and .
10. Right Hand Pinky Finger: P, ;, :, ‘, “, /, ?, [, ], {, }, \, |, Shift, Enter and Backspace
Try placing your hands on the keyboard and typing in each character a time or two, with its assigned finger, to see how it feels.
Try typing a sentence or a paragraph and see what happens. If you’re anything like me, you may eventually deviate and find yourself using un-assigned fingers for some keys. Don’t worry; I won’t call the typing police.
The best advice that I can give you, is to start slow. Get comfortable with your finger placement and allow them to speed up in their own good time.
Begin by watching your fingers, then gradually watch them less and less as you pay more attention to the results on your screen.
With enough practice you can give my sister (and her 110 WPM) a run for her money!