 Gimp’s four basic paint tools — pencil, paintbrush, airbrush and the ink tool — are lumped together in a category that also includes the bucket fill, gradient, eraser, clone, perspective clone, heal, convolve, smudge, and dodge/burn tools.
These all work together in similar ways to draw, paint, and/or similarly modify an image.
You may remember that I already broke down the basic purpose, or description/use, of each tool in a previous lesson Exploring the Gimp Toolbox, so this time we’ll focus on the paint tool options, shortcuts, etc.
Paint Tool Options
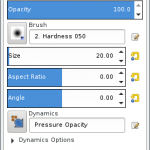 Most paint tools share a standard set of options; some options apply to only specific paint tools.
When options are adjusted, the changes apply to all of the relevant paint tools, not just the currently-selected tool.
We’ll cover here many of the standard options that apply to multiple paint tools.
Note that most options have a “Reset” icon on the right to return them to their original status — though, closing Gimp without saving the Tool Presets works, too!
Mode
The drop-down of application modes include options such as normal, dissolve, lighten, darken, overlay, soft light, hard light, etc.
Opacity
The opacity slider allows you to adjust a brush’s transparency level.
Brush
The brush option allows you to select from 54 different brush types, include solid and mottled brushes, a sun, and even a green pepper!
Size
The size of the brush can easily be adjusted via this option.
Aspect Ratio
The aspect ratio adjusts the ratio between the width and height of a brush.
Angle
The angle option turns the brush at specified angles (which is especially visible on non-round brushes, wouldn’t you know it!)
Dynamics
The dynamics option adjusts how much the speed/pressure/etc. of the mouse or input device affects the brush strokes.
Dynamics Options
The dynamic options are hidden, but can be expanded, allowing you to adjust fade/repeat/reverse/color options for the dynamic selection.
Apply Jitter
The apply jitter option allows you to set how far apart or close together brush strokes are, so that they result in continuous lines — or not!
Smooth Stroke
The smooth stroke options allows you to adjust the quality and weight of your brush strokes.
Incremental
The incremental option allows you to over-ride the opacity slider’s settings if it is less than 100%.
Pencil Tool
![]() Keyboard Shortcut: N
Keyboard Shortcut: N
Holding down the Ctrl key while using the pencil will activate the “color picker” so that you can quickly select a new color.
Holding down the Shift key while using the pencil will guide you in using the tool in a straight line.
Paintbrush Tool
![]() Keyboard Shortcut: P
Keyboard Shortcut: P
Holding down the Ctrl key while using the paintbrush will activate the “color picker” so that you can quickly select a new color.
Holding down the Shift key while using the paintbrush will guide you in using the tool in a straight line.
Airbrush Tool
![]() Keyboard Shortcut: A
Keyboard Shortcut: A
Holding down the Ctrl key while using the airbrush will activate the “color picker” so that you can quickly select a new color.
Holding down the Shift key while using the airbrush will guide you in using the tool in a straight line.
Ink Tool
![]() Keyboard Shortcut: K
Keyboard Shortcut: K
Holding down the Ctrl key while using the ink tool will activate the “color picker” so that you can quickly select a new color.
Holding down the Shift key while using the ink tool will guide you in using the tool in a straight line.
Bucket Fill
![]() Keyboard Shortcut: Shift + B
Keyboard Shortcut: Shift + B
Holding down the Ctrl key while using the bucket fill tool toggles the use of the background fill color vs. the foreground fill color.
Holding down the Shift key while using the bucket fill tool toggles the use of “Fill Similar Color” and “Fill Whole Selection”.
Blend (Gradient)
![]() Keyboard Shortcut: Shift + L
Keyboard Shortcut: Shift + L
Holding down the Ctrl key while using the blend tool creates straight lines that are constrained to 15 degree absolute angles.
Eraser
![]() Keyboard Shortcut: Shift + E
Keyboard Shortcut: Shift + E
Holding down the Ctrl key while using the eraser will activate the “color picker” so that you can quickly select a new color.
Holding down the Shift key while using the eraser will guide you in using the tool in a straight line.
Clone Tool
![]() Keyboard Shortcut: C
Keyboard Shortcut: C
Holding down the Ctrl key while using the clone tool will set a new clone source (set reference points for copying).
Holding down the Shift key while using the clone tool will guide you in following a straight line.
Perspective Clone Tool
![]()
Holding down the Ctrl key while using the perspective clone tool will allow you to select a new clone source.
Holding down the Shift key while using the perspective clone tool will allow you to see a thin connecting line between the previously clicked point and your pointer location (if the source is set).
Heal Tool
![]() Keyboard Shortcut: H
Keyboard Shortcut: H
Holding down the Ctrl key while using the heal tool will allow you to select the source, to heal from any layer of an image.
Holding down the Shift key while using the heal tool will guide you in using the tool in a straight line.
Blur/Sharpen (Convolve Tool)
![]() Keyboard Shortcut: Shift + U
Keyboard Shortcut: Shift + U
Holding down the Ctrl key while using the convolve tool will switch from blur mode to sharpen mode.
Holding down the Shift key while using the convolve tool will guide you in using the tool in a straight line.
Smudge Tool
![]() Keyboard Shortcut: S
Keyboard Shortcut: S
Holding down the Shift key while using the smudge tool will guide you in using the tool in a straight line.
Holding down the Shift + Ctrl keys will allow you to constrain the angle between two successive lines to vary by steps of 15°.
Dodge/Burn Tool
![]() Keyboard Shortcut: Shift + D
Keyboard Shortcut: Shift + D
Holding down the Ctrl key while using the dodge/burn tool will switch from dodge mode to burn mode.
Holding down the Shift key while using the dodge/burn tool will guide you in using the tool in a straight line.
Conclusion
To better understand each paint tool and its options, I recommend opening up an image in Gimp and trying out each tool, adjusting various options as you go.