 Text and images are pretty much polar opposites, but quite often they intersect — usually in the form of text being used in images.
This necessitates a features that all image-editing programs seem to share — the text tool.
Gimp’s text tool is much like any other standard image editor’s text tool, but we’ll cover it today in some detail.
Using the Text Tool
![]() To begin, click on the text tool icon in your toolbox, or use the t keyboard shortcut, or go to Tools > Text on the menu.
To begin, click on the text tool icon in your toolbox, or use the t keyboard shortcut, or go to Tools > Text on the menu.
On your image, you can either draw a rectangle to hold your text (which can be limiting, but can also be enlarged later) or click once on the image, right where you want your text to begin.
After that, you can type away and see your results take shape.
You will notice that each time you click to create a new text box, a text option dialog box will appear directly above it.
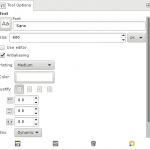
The text option dialog box allows you to change the text font, size, baseline, kerning, color and style (remove all style, bold, italic, underline, strike-through).
(The baseline is the line on which the letters sit, and the kerning adjusts space between letters.)
There is a text editor available — activated via a check box on the text tool options — which allows you to type in your text and style it all in a single box.
You can change your text at any time in a Gimp file by clicking on the text (with the text tool activated). Both the text and its style can be changed.
You should note that a new layer is created for each text box populated. Layers are a very useful aspect of image-editing that we’ll get into more later.
You can use other tools with your text, such as the Move tool to change the text’s location.
Text Tool Options
 The text tool options are normally found below the toolbox. The available options are as follows:
Font
You can scroll through — or type in — font names, to choose from among those installed on your system.
Size
You can increase/decrease the text size, or change its unit of measurement from pixels to any one of the ten other options available.
Use Editor
This check box pops up the text editor box, which allows you to type/style text all in one separate box.
Antialiasing
Antialiasing will smooth text out, blurring and merging the angles and curves.
Hinting
Hinting can help to clarify text, and is especially useful for smaller font sizes.
Color
Allows for changes to be made to the color of the text.
Justify
Text can be “justified” to fit the text box either by being positioned to the left, right, center, or by filling the available space from side to side.
Indent
The first line of paragraphs can be indented by increasing the number above 0.
Line spacing
Lines of text can be made closer together or farther apart by changing of the line spacing values.
Letter Spacing
Letters can be made closer together or farther apart by changing the lettering space values.
Text Box
The text box default is dynamic, allowing the size to increase as you type, or for text to go outside of the box.
The drop-down allows you to choose a fixed box, which will not allow text beyond its lines, which can be manually enlarged.
Language
Since I installed Gimp in English, my text is set to a default of English, but I assume that changing this field would make it easier to handle text in other languages.
Text Context Menu
Right-clicking on a text box will open the Text Context Menu, where you can find options such as Cut, Copy, Paste, Delete, Open text file, Clear, Path from text, Text along path, From left to right, From Right to left, and Input Methods.
Many of these are standard, but some are particularly cool; the Open text file option allows you to choose a text file, and deposits its contents right into your text box!
Conclusion
Thus concludes the very basics of how to add text to an image in Gimp.
You can add special effects to text using other tools and features available in Gimp.
One of my favorites is How to Outline Text.
One of the easiest is Gimp’s built-in logo-making script, found by going to File > Create > Logos.
