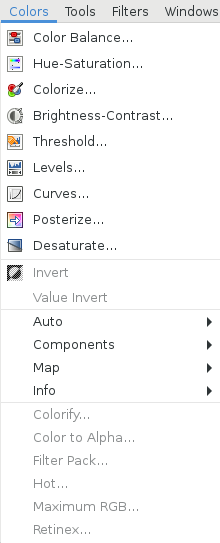
 In Gimp’s main menu is a “Colors” drop-down with 20+ options that we will briefly explore in this second part of Coloring in Gimp.
The first nine entries in the color menu are a variety of color tools that can also be found under Tools > Color Tools and as options that can be added to the toolbox.
The remaining entries are no less useful and/or interesting.
Color Tools
Color Balance
![]() The color balance tool makes subtle changes to the — yep, you guessed it — color balance of an image, area, or layer.
The color balance tool makes subtle changes to the — yep, you guessed it — color balance of an image, area, or layer.
This is a great tool to use on digital photographs to correct predominant colors.
Hue-Saturation
![]() The hue-saturation tool is used to — you’re getting too good at this — adjust the hue and saturation (along with lightness) levels of an image, area, or layer.
The hue-saturation tool is used to — you’re getting too good at this — adjust the hue and saturation (along with lightness) levels of an image, area, or layer.
Colorize
![]() The colorify filter allows you to render an image, area, or layer as if it is being seen through colored glass.
The colorify filter allows you to render an image, area, or layer as if it is being seen through colored glass.
Brightness-Contrast
![]() The brightness-contrast tool allows you to adjust the brightness and contrast of an image, area, or layer.
The brightness-contrast tool allows you to adjust the brightness and contrast of an image, area, or layer.
It is a quick and easy solution for making such adjustments without much hassle.
Threshold
![]() The threshold tools transforms an image, area, or layer into a black and white image (not greyscale).
The threshold tools transforms an image, area, or layer into a black and white image (not greyscale).
This leads to some neat cartoonish effects that can be generated very quickly.
Levels
![]() The levels tool allows you to adjust the color levels or intensity of an image, area, or layer.
The levels tool allows you to adjust the color levels or intensity of an image, area, or layer.
It can lighten, darken, and change the contrast and color cast, etc.
Curves
![]() The curves tool allows you to change color, brightness, contrast and transparency of an RGB image, area, or layer, with more finesse than the other tools available for this purpose.
The curves tool allows you to change color, brightness, contrast and transparency of an RGB image, area, or layer, with more finesse than the other tools available for this purpose.
Posterize
![]() The posterize tool allows you to reduce the number of pixel colors in an image, area, or layer, without significant losses of the original image characteristics (depending on the settings you choose!)
The posterize tool allows you to reduce the number of pixel colors in an image, area, or layer, without significant losses of the original image characteristics (depending on the settings you choose!)
Desaturate
![]() The desaturate tool allows you to convert the colors of an image, area, or layer, to corresponding shades of gray.
The desaturate tool allows you to convert the colors of an image, area, or layer, to corresponding shades of gray.
This does not mean greyscale, as it operated only on the active layer and the colors are still RGB, so you can still paint RGB colors on the image later on.
Other Color Menu Entries
Besides the color tools, there are a number of entries in the color menu that can be used.
Invert
The invert tool reverses pixel and brightness values so that they end up pretty much the opposite of how they started out.
Value Invert
The value invert tool reverses the luminosity (mostly) without affecting hue and saturation values.
The Auto Submenu
Auto > Equalize
The equalize command adjusts brightness levels so that the values are as equal as possible, which can create some seriously wonky effects on an image if you don’t know what you’re doing!
Auto > White Balance
The white balance command adjusts RGB images (not greyscale or black and white) by “stretching out red, green, and blue channels separately”.
If you know what that means, good for you. What is means to me is that it makes some photos look better and some look much, much worse!
Auto > Color Enhance
The color enhance command increases saturation without altering hue or brightness.
The effect on my test photo — which was slightly pale — was quite pleasing.
Auto > Normalize
The normalize command adjusts brightness values to make dark points black and bright points much brighter, without altering hues.
This can be used to normalize dim and washed-out images. I liked the effect of this command, when applied to a photograph.
Auto > Stretch Contrast
The stretch contrast command stretches the histogram values, meaning it finds the min. and max. values and uses them to stretch the RGB values, making bright colors brighter and dark colors darker.
The result is… interesting? There must be very specific and useful applications for this type of command, which I have yet to discover!
Auto > Stretch-HSV
The stretch HSV command does the same as the stretch contrast command, but with the HSV values instead of RGB.
The effect of this command applied to a photograph was subtle, and actually not too bad!
The Components Submenu
Components > Channel Mixer
The channel mixer command combines the value of the RGB channels.
Components > Compose
The compose command makes up a colored image from a greyscale image or layer.
Components > Decompose
The decompose command makes up a greyscale image from a colored image or layer.
Components > Recompose
The recompose command makes a colored image out of a greyscale image, directly from its RGB/HSV components, rather than via a dialog.
The Map Submenu
Map > Rearrange Colormap
The rearrange colormap command allows you to rearrange colors in the palette of indexed images.
Map > Set Colormap
The set colormap command allows you to select a new palette to replace the color map of your indexed image.
Map > Alien Map
The alien map modifies RGB and HSV colors by applying trigonometric functions.
Map > Color Exchange
The color exchange filter exchanges one filter for another.
Map > Gradient Map
The gradient map uses the currently selected gradient to recolor an image’s active layer or selection.
Map > Palette Map
The palette map recolors images using colors from the current palette.
Map > Rotate Colors
The rotate colors command allows you to change one color range to another.
Map > Sample Colorize
The sample colorize filter allows you to add color to black-and-white images by mapping a color source image or a gradient against it.
The Info Submenu
Info > Histogram
The histogram is a dialog that shows you info about the statistical distribution of color values in an image.
Info > Border Average
The border average calculates the color most often used in a specified border, and makes that the selected foreground color.
Info > Colorcube Analysis
The colorcube analysis shows the dimensions of an image, along with the number of unique colors in it.
Info > Smooth Palette
The smooth palette creates a striped palette from the selection or layer.
The created palette is shown as a new image, and is intended for use with the Flame filter.
The Color Filters
Filters are tools that apply mathematical algorithms to produce a variety of effects on images.
Colorify
The colorify filter renders an image as if it is being seen through colored glass.
Although it is very similar to colorize, you can choose any color for this particular effect using colorify, opening up a variety of intriguing possibilities.
Color to Alpha
Is transparentizes a word? Because I want to say that the color to alpha filter transparentizes all pixels of an image that have a selected color, but I’d better stick to saying “makes transparent” so that nobody gets too confused.
Filter Pack
The filter pack applies a range of filters to enhance an image all at once.
Hot
The hot command identifies — and fixes — pixels that might cause problems when displayed on PAL or NTSC TV screens.
Maximum RGB
The maximum RGB filter is one I have yet to figure out an actual use for. It creates an image with only red, green, and blue colors by minimizing or maximizing pixel intensity.
Retinex
The retinex filter improves the visual rendering of an image, especially for images with bad lighting conditions.
Conclusion
Only a few color-related topics remain before we move onto other aspects of Gimp.
Next up we’ll tackle those few.