 Paths made via the path tool use Bézier-curves to allow you to make elaborate designs.
Paths can either be “stroked” (have styles applied along the paths) or they can be used as a method of selection (in place of the rectangular/ellipse/free/fuzzy/foreground/color/scissors select options).
Paths are deceptively easy to use, and quite useful, so they are today’s subject of choice. Let’s jump right in!
About Paths
Paths are made up of a series of line segments (straight or curved) and anchor points.
Paths are saved in Gimp’s native XCF file format. They can be copied from one image to another.
Selections can be made into paths, just like paths can be made into selections.
Gimp allows you to import paths from SVG files using the paths dialog, making it easy to work with programs such as Inkscape.
Bézier Curves
Bézier curves are smooth curves based on a mathematical formula that can be scaled indefinitely, making them ideal for vector image usage.
Bézier curves have 4 “control points”, or two points that each have a “handle”.
Additional details for the technically-minded can be found here and here.
How to Create a Path
![]() Select the path tool (keyboard shortcut B) to begin.
Select the path tool (keyboard shortcut B) to begin.
Click on various points of your image to create unique “anchor points” along your path.
You will see that each anchor point is connected to the previous one with a straight line.
You can curve those straight lines to refine your path by using one or more of the following methods:
1. Click and hold while creating a new anchor point, and move your mouse around until the line segment has curved like you want it to, then release the mouse button to create that point with the curved path segment.
2. You can go back to a previous anchor point at any time and click/drag to adjust its location, and so also the connecting line segment(s).
3. You can go back to a line segment and click/drag to curve it as needed, or select a line segment and then adjust it by dragging around the square “handles” that appear over each point. When finished adjusting a line segment, click on the last anchor point to continue the path.
To add new anchor points in the middle of a path, choose the “Edit” mode option in the tool’s options, or hold down the Ctrl key and click on the connecting line where the anchor point should be added.
To move your entire path, select the “Move” tool option and drag the path to its new location.
There is a tool option that allows you to turn your path into a selection. If your path is “open” it will be closed by a straight line that connects the last anchor point to the first anchor point.
How to Stroke a Path
 Paths are often used as a selection or guide, but they can also be “stroked” to create visible lines on the image.
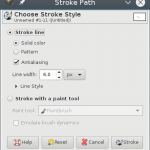
Once your path is ready, choose “Stroke Path” from the tool options and look over the dialog that appears.
You can choose between stroking the path with a solid color, a pattern, or any one of the paint tools, with various options for each one.
Once you have made a choice, select “Stroke” and see what happens. If you don’t like it, you can always undo and try again.
Conclusion
All kinds of useful tasks and cool effects can be accomplished using the path tool, as evidenced even by Gimp’s documentation about paths and text.