 Some methods of file manipulation are universal, and differ little — if any — from one file manager (or operating system) to the next.
You can move, edit, rename, view, order, copy, sort, group and otherwise change how files and folders act.
And there are usually multiple methods of accomplishing each action, allowing you to choose which ones work best for you.
In this three-part series we’ll cover some of the most basic aspects of file management.
File Properties
File properties are fields that provide information about each file.
File properties standardly include details such as the file name, file type, size, and creation/modification/last access dates.
Photo properties may include very detailed fields for the type of camera used to take the photo, as well as the camera settings used at the time.
Music file properties may include details about the artist, track, length, etc.
To view files properties, right-click a file and select Properties.
Alternatively, if the file is already open, in some programs you can go to File > Properties.
In Windows 7, you can edit many of the file property fields.
How to Move Files & Folders
The ability to move things around is probably one of the most well-known file management skills.
So you probably already know all about it; feel free to skip this section, otherwise consider it a review.
1. Files and folders can be dragged and dropped into other folders.
2. Files and folders can be cut and pasted into other locations. (Remember to use keyboard shortcuts!)
3. You can use the command line to move files and folders to new locations.
Note: If you open a file and Save As… to be able to to save it to a new location, remember that the original file will still exist where you left it, so it does not move the file, only copies it.
How to Create New Files and Folders
No doubt you have already created new files countless times. But what method have you used?
Opening a program to a new/blank document/file/etc. and saving it, is no doubt the most common method of new-file creation.
There’s another way to create many type of new documents — a way that you may find very simple if you spend much time in your file manager.
Simply right-click on empty space in your file manager window (below or alongside files or folders) and move the mouse pointer to hover over Create New.
In the menu that appears, you will have several options that will allow you to create a new folder, or any one of several popular file types.
Once you pick an option, you will be prompted to give a name to the new (empty) file or folder that will pop up in your current directory.
How to Delete & Recover Files and Folders
Deleting files and folders is easy — almost too easy.
To delete, right-click on a file/folder and select Delete, or select a file/folder and hit the Del key.
Unless you pay careful attention, you’re liable to delete something that you’ll regret, at least once in awhile.
Lucky for you, the standard delete will only send a file or folder to your Recycle Bin.
Recovering files, in those instances, is quite simple.
Open your Recycle Bin.
In Windows 7, if there is not an icon on your desktop, right-click on your desktop, select Personalize, then go to Change desktop icons to restore it.
In the Recycle Bin, right click the file in question and select Restore. Alternatively, click the Restore all items button that will change to Restore this item when you select a specific file. Note: multiple files can be restored to multiple locations at once.
In Linux, if there is not a Trash icon on your desktop, open Dolphin and there should be a Trash folder in the Places panel. The wording might be different, but the concept/methods of restoration are the same as in Windows.
Now, back to my comment about a “standard delete”. What I meant by that, is that there are ways to delete so that you bypass your Recycle Bin and cannot recover your files.
If you want to try this (and I would be vewy, vewy caweful if I were you), hold down the Shift key while deleting the file. It’s that simple. It’s that scary.
#CueTheNightmares
Quick question: Do you ever empty your recycle bin?
And I’m not talking about the one under your desk; I’m talking about the one on your computer desktop.
I’m just curious, because I empty mine just about as soon as I know there is anything in it, but I’m pretty sure no one else that I know ever empties theirs.
Consider this: Emptying your recycle bin frees up space. It un-clutters so that you can find accidentally-deleted files more quickly. It’s efficient. It’s organized. It’s edifying. Convinced?
Right-click on your Recycle Bin icon and Empty Recycle Bin today!
#CutDownOnClutter #HypocritalDigitalPackRat
How to Use the Details View to Promote Order
One of the most useful methods of file management (to me) is the ability to change the order of the files and folders in each location.
On your desktop, you can order and arrange by dragging icons around, and they will (mostly) stay put. In other locations, accessed by a file manager, you are at the mercy of the file manager.
Lucky for you, file managers allow you to specify what property your files and folders are ordered by. You can order by name, date, size, or any other property.
To begin, change the viewing method to Details. This can be a temporary step; you can change back later to your preferred viewing style(s).
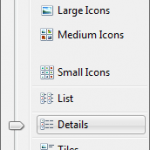 In the Windows 7 File Explorer, go to the Change your view icon near the top right corner. Click on it to get a menu like the pictured example, from which you can select Details. Alternatively, you can right-click on empty space and select View > Details.
In the Linux file manager Dolphin, click on the Details view icon, or go to Control > View Mode > Details, or use the Ctrl + 3 keyboard shortcut.
Once in details view, you will see your files/folders lined up in one long (or short!) column. There will be one or more additional columns displaying other file properties. Each column will be labeled with a title, similar to these examples:
![]()
![]()
You can show even more columns (or hide existing columns) by right-clicking any column title and toggling the check-boxes of the available properties.
To re-arrange the column order, simply grab a title and drag it past other columns until it snaps into place where you want it.
To re-size column width, grab the dividing lines between column titles, and drag them back and forth. Alternatively, double-click each dividing line to make the column width fit the text length of the longest property in that column.
And finally, to order by a specific property, click on the title of the property that you want to order by. A little arrow will appear in the selected column to indicate the column is being used to order by. Click the same title again to switch between ascending and descending order. Notice that the arrow flips to indicate ascending/descending order also.
Now you can change the view method back to whichever option you prefer for the current directory.
There are other (similar) options in the right-click context menu if you care to explore them — especially in Windows 7. Test and find out what Sort by and Group by will do!
Conclusion
For the most part, unless otherwise noted, file management is the same in both Windows and Linux.
There are a multitude of things that you can do to manage files on both operating systems.
Stay tuned for part two and three of the series!