![]() They say that email is dying, but I have yet to see evidence to back that particular claim.
They say that email is dying, but I have yet to see evidence to back that particular claim.
On the average weekday, I receive and send an average of 50-75 emails from one or another of my email addresses.
It quickly becomes difficult to manage multiple email addresses, so I have a simple solution.
Thunderbird.
Similar to the widely-known Microsoft Outlook, Mozilla Thunderbird is a program that allows you to manage both emails and news feeds.
And the great news?
Thunderbird runs (for free) on both Windows and Linux!
Installing Thunderbird on Windows
For Windows-users, Thunderbird can be downloaded from the Mozilla website and installed with a grand total of 1 double-click and 5 single-clicks (Yes > Next > Next > Install > Finish).
Thunderbird can be found, after installation, in your Start > All Programs.
Installing Thunderbird on Linux
For Fedora 21 users, a quick yum install thunderbird command, run from the terminal, will do all of the hard work for you.
After that, Thunderbird can be found at Application Launcher > Internet > Thunderbird (Email).
Setting Up Thunderbird
 When Thunderbird is first run, you have the options of setting up a brand new email, configuring your account later, or setting up an existing email.
In all probability, you’ll want to jump right into the “Skip this and use my existing email” settings.
Simply fill out your name, email, and password, then choose if you want your password remembered, and click Continue.
Your server settings will be looked up for you, but you can manually configure them if you’re feeling particularly adventurous.
When you’re satisfied, click Done, and allow your emails to load.
You can set up additional email addresses by clicking on the the menu button (found on the far right of the Mail Toolbar and characterized by 3 horizontal lines) and hovering over Preferences (on Linux) or Options (on Windows) to select Account Settings.
Alternatively, if your Menu Bar is in view, you can click Edit > Account Settings (in Linux) or Tools > Options (in Windows).
To restore the Menu Bar, right-click on a toolbar near the top of your Thunderbird window, and check the Menu Bar box.
 In Account Settings, you can “Add Mail Account…” and set up each consecutive email address by following the same process as the first.
Account Settings
 Now, while still in Account Settings, there are some very important settings to go over, some of which help not only you, but also the people that receive your emails.
You can change your account name at any time, mostly to change how each account is displayed within Thunderbird itself.
For each account, it is ideal to fill out your Name and Reply-to Address, as they will be shown/used when other people receive your emails.
You can fill out an organization, and create or attach your signature.
For each account, you can change your Server Settings (which I don’t recommend, especially if you can already send and receive emails!).
Under Copies & Folders, you can change where your emails are stored at various stages of the process.
Under Composition & Addressing, you can specify how your emails are structured when they are composed, and how you addressing works.
The remaining settings that you can adjust, are listed under Junk Settings, Synchronization & Storage, Return Receipts, and Security.
Your Outgoing Server (SMTP) settings are separate, and can be each be edited as needed.
Thunderbird Preferences
In Linux, Preferences can be opened either from Edit > Preferences (if your Menu Bar is showing), or from the menu button.
In Windows, you have Options instead, which can be opened either from Tools > Options (if your Menu Bar is showing), or from the menu button.
In the General tab, you are presented with an option to change the location of the Start Page, or to stop showing it altogether. You can also edit your new message sound and alert options here.
In the Display tab, you can choose the default font, color, and other display settings used in Thunderbird.
In Composition, you can set up all of your preferences for writing emails, addressing, and spelling. My favorite setting is “Check for missing attachments”, which is checked by default. Mild annoyance aside, it’s very helpful!
The Chat, Private, and Security settings can all be adjusted to fit your needs, but I like the defaults.
In Attachments > Incoming, you can choose to either save files to a specified location, or you can have Thunderbird ask you where to save each file.
Your Advanced settings can also be adjusted, as your preferences dictate.
Setting Up RSS Feeds in Thunderbird
 You can set up your RSS feeds in Thunderbird, to receive news and updates much like you would receive an email.
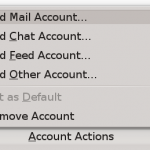
Go back to Account Settings, and select Account Actions > Add Feed Account.
You will need to confirm a name for the account (it can be changed later). Then click Next > Finish.
Immediately, you can change the account name, the frequency at which the feeds will be checked, etc.
Click on Manage Subscriptions… to start adding feeds.
Paste an RSS feed URL into the “Feed URL” field, and click Add. The feed will verify and be added to the account.
Click on the account name again, to clear the fields, and repeat the process to add additional feeds.
To remove a feed, select the feed and then click the Remove button.
Once all of your feeds have been added, you can back them up as a single file which can be imported the next time you set up Thunderbird — it’s a great time-saver.
To backup, select the account, then click the Export button and save the file.
The import process works the same way — only opposite.
Summary
There are many other options that you can customize in Thunderbird. A few of my favorites are:
1. Right-click the toolbar and Customize, to pick and choose which buttons show up on your toolbar.
2. Sort/order your emails by size, or date, or sender, etc. by clicking the relevant column’s header/label.
3. Add more columns by clicking on the icon to the far right of the column headers, and picking new fields from the list.
And last, but not least, experiment!
No Comments Yet